New month, new Fadengrafik Challenge. In March, we'll be looking for your "ATG" projects: feel free to join us with any of your crafting projects, given they include some kind of paper embroidery.
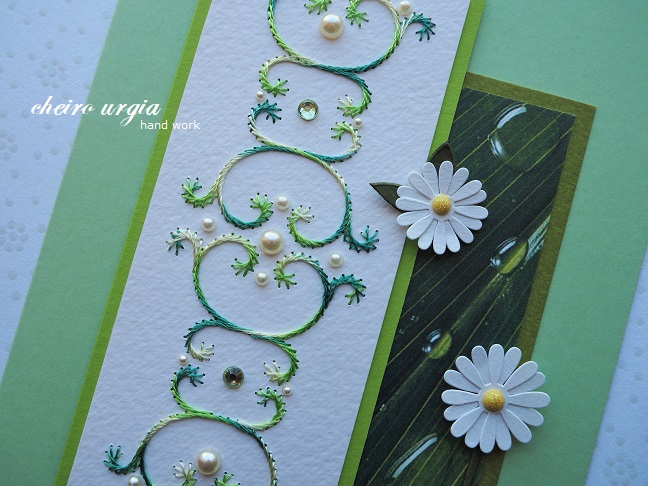
For my DT creation, I decided to be inspired by the season and use an ornament that I've made ages ago. Using a yarn with different shades of green gives a lovely dynamic to the swirls, but I just couldn't come up with an idea to use it properly. Until I found another pre-crafter thing in my stash: a stripe of patterned paper that was already glued on a background of green cardboard. It must be some kind of crafting leftover from another project, and it occured to me I migt as well join the two pieces.
To make the stitched ornament more stable, I placed it on a green background cardboard as well. Also, I decorated the swirls with a couple of pearls and gemstones to resemble the raindrops in the other background paper.
Then, I thought I'd overlap both pieces and place them onto a plain white cardbase. However, as there seemed to be too much white in the background, I opted for a pastel green cardbase.
In the very end, I used a couple of flower stickers from my stash. I'm not sure whether they take away from the main motif or contribute to it, but I've had them in my drawer for way too long and simply wanted to get rid of them soon.
A little contribution to the March collection of Create in Austria - artwork created by Austrians and/or in Austria.
A little contribution to the collection of hand-stitching at made with Blümchen.
challenges:
- krafty chicks: ATG with optional twist "shimmer & bling"
- a bit more time to craft: ATG
- allsorts challengeblog: favourite season (spring)
- alphabet challengeblog: Y for yarn, string or twine
- as you like it: one or many layers (I'll usually use multiple layers in my cards - one of the reasons being that I hardly ever use stamps/digis/CAS and the other that as soon as I start going through my stash, I always find more than one paper that I'd like to use)
- crafty catz: ATG
- crafty sentiments: ATG
- craftyhazelnutspatternedpaper
- creative moments: ATG
- cute card thursday: greens
- friendship challenge: ATG with optional twist "spring flowers"
- love to craft: ATG
- pennys papertake: ATG
- scrapping4fun: layers
- male room: ATG
- through the craftroom door: ATG
- worldwide open design team challenge: ATG
And what about that spring jar thing? Spending loads of time away lately, I managed to go from winter to spring and back again a couple of times, only to find the most beautiful spring entrance in the past week - chill mornings and wram sunny days, spring flowers blooming and the bees going wild, even the first butterflies have come out of their hiding already.
"Away" of course means no proper opportunity for colourful bouquets, however, I ound a pair of plucked snowdrops on one of my spring walks and decided to place them in an empty yogurt glass in a rescue attempt.
Despite not having much hope, they recovered completely and kept me company for a whole week. Also, who knew that only a pair of snowdrops is enough for a lovely smell of spring?
A contribution to the Friday Flowerday at Holunderbluetchen.
... this is what happens if you unleash a med student with no husband, no kids, no pets and too much leisure time ...
02 March, 2019
21 February, 2019
Pieces of happiness
One day, I might be able to put my thoughts together in an orderly manner. Define myself again in circumstances I didn't expect to happen, not now and not in this way. Find a purpose away from many things I thought I'd become. One day, I'll be fine.
Until then, I couldn't help bringing those little blooms with me from my visit to the nearby supermarket. The soft roses are a bit smaller than your usual rose blossoms, and in my opinion, that's exactly what makes them super cute and lovely. Like little pieces of happiness in an attempt to cover up.
Additionally to their size, I also like the combination of soft pink and cream blooms which looks particularly adorable.
To arrange them properly, I've picked an empty compote glass.
A contribution to the Friday Flowerday at Holunderbluetchen.
For the matching feel-good project, I have been working with napkins again some time ago. I decided to cover wooden discs with acrylic paint and some colourful motifs to create small decorative objects. I would paint the straight back surface with multiple layers of soft pink acrylic paint, and repeat the process on the domed front with layers of white. When everything was dry, I would take pieces of a napkin, arrange them on the tiny surface and fix them with layers of transparent varnish.
I could write short positive messages on the back side of the discs and give them away to dear ones. Or give them as they are, with an empty space to put down their own thoughts/wishes/favourite quotes. I might even come up with a completely different purpose when I get to finish the wooden discs that are still waiting for their paintwork.
A little contribution to the February collection of Create in Austria - artwork created by Austrians and/or in Austria.
challenges:
- krafty chicks: ATG
- 613 avenue create: ATG
- a bit more time to craft: ATG
- crafting with an attitude: ATG
- crafty catz: ATG with optional twist "keep it simple"
- crafty sentiments: spring
- double D challenges: pink & white
- everybody art: animals (butterflies)
- love to craft: ATG
- pile it on: pink
- through the craftroom door: ATG
- pinspirational
- worldwide open design team challenge: ATG
Until then, I couldn't help bringing those little blooms with me from my visit to the nearby supermarket. The soft roses are a bit smaller than your usual rose blossoms, and in my opinion, that's exactly what makes them super cute and lovely. Like little pieces of happiness in an attempt to cover up.
Additionally to their size, I also like the combination of soft pink and cream blooms which looks particularly adorable.
To arrange them properly, I've picked an empty compote glass.
And as this is such a wonderful collection of pink...
... it seems more than perfect to resemble nature's awakening, alongside with a sense of positivity, and a sense of feeling good in my own skin. One day.A contribution to the Friday Flowerday at Holunderbluetchen.
For the matching feel-good project, I have been working with napkins again some time ago. I decided to cover wooden discs with acrylic paint and some colourful motifs to create small decorative objects. I would paint the straight back surface with multiple layers of soft pink acrylic paint, and repeat the process on the domed front with layers of white. When everything was dry, I would take pieces of a napkin, arrange them on the tiny surface and fix them with layers of transparent varnish.
I decided to make each piece unique by using different flower arrangements and even adding a couple of butterflies.
I'm not yet sure about how to use the whole thing so it's stored in my stash right now, but I might as well place it somewhere in my apartment to create a seasonal flower decoration. On the other hand, upon starting the process I thought about creating small giveaways that one can just hold in their hand when they feel like it. (For imagination, the diameter of the larger circles is about 5 cm, while the smaller ones measure about 3 cm.)I could write short positive messages on the back side of the discs and give them away to dear ones. Or give them as they are, with an empty space to put down their own thoughts/wishes/favourite quotes. I might even come up with a completely different purpose when I get to finish the wooden discs that are still waiting for their paintwork.
A little contribution to the February collection of Create in Austria - artwork created by Austrians and/or in Austria.
challenges:
- krafty chicks: ATG
- 613 avenue create: ATG
- a bit more time to craft: ATG
- crafting with an attitude: ATG
- crafty catz: ATG with optional twist "keep it simple"
- crafty sentiments: spring
- double D challenges: pink & white
- everybody art: animals (butterflies)
- love to craft: ATG
- pile it on: pink
- through the craftroom door: ATG
- pinspirational
- worldwide open design team challenge: ATG
06 February, 2019
Red rose
How can it be that January is gone already and I didn't seem to make any progress in terms of University, or crafting, or anything? As time flies inexorably, I managed to use one of my pre-stitched motifs for the February Fadengrafik Challenge which says "Valentine's Day".
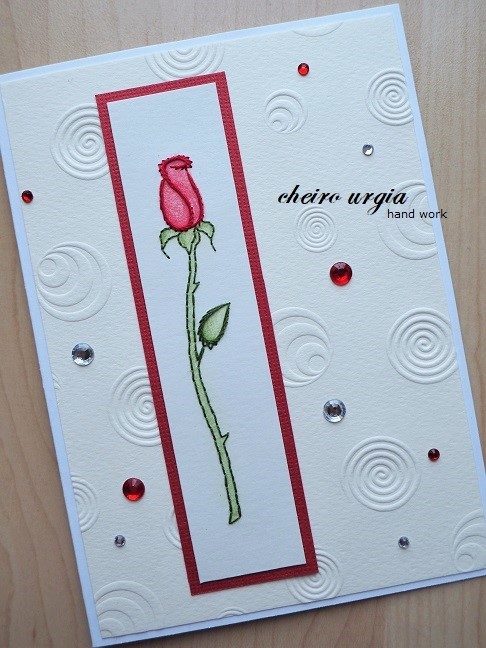
The red rose was buried in my stash for too long, when I finally tried to match it with some of my background papers. I thought I'd go with something as neutral as possible to let the main motif shine, and in the end, I opted for this beige paper with embossed circles. I thought about adding another layer of red cardboard for the background, but in the end, I decided to give up that idea.
Instead, I enhanced the floral motif by colouring the stitched rose with coloured pencils. Unfortunately, while doing so, I ended up with a stain of colour in the background that just wouldn't go away. To make the best of that mishap, I placed shimmering gemstones in red and silver all over the embossed paper.
The card itself has already arrived to a dear person - not as a Valentine's card but as a message full of birthday wishes for my wasn't-meant-to-be mother in law, who is by far one of the most lovable people on the planet.
A little contribution to the February collection of Create in Austria - artwork created by Austrians and/or in Austria.
A little contribution to the collection of hand-stitching at made with Blümchen.
challenges:
- krafty chicks: ATG
- 613 avenue create: ATG
- a bit more time to craft: ATG
- allsorts challengeblog: love
- brown sugar: love/Valentines
- cardmania: love is in the air
- crafty catz: ATG
- crafty gals corner: CAS
- crafty sentiments: ATG
- creative inspirations: lots of love
- cute card thursday: Valentines
- kreativtanten: in my heart
- love to craft: ATG
- my time to craft: all you need is love
- path of positivity: love
- scrapping4fun: love/wedding/Valentines
- male room: ATG with optional twist "love"
- through the craftroom door: ATG
- tuesday throwdown: embossing
- wortartwednesday: ATG
- worldwide open design team challenge: ATG
The red rose was buried in my stash for too long, when I finally tried to match it with some of my background papers. I thought I'd go with something as neutral as possible to let the main motif shine, and in the end, I opted for this beige paper with embossed circles. I thought about adding another layer of red cardboard for the background, but in the end, I decided to give up that idea.
Instead, I enhanced the floral motif by colouring the stitched rose with coloured pencils. Unfortunately, while doing so, I ended up with a stain of colour in the background that just wouldn't go away. To make the best of that mishap, I placed shimmering gemstones in red and silver all over the embossed paper.
The card itself has already arrived to a dear person - not as a Valentine's card but as a message full of birthday wishes for my wasn't-meant-to-be mother in law, who is by far one of the most lovable people on the planet.
A little contribution to the February collection of Create in Austria - artwork created by Austrians and/or in Austria.
A little contribution to the collection of hand-stitching at made with Blümchen.
challenges:
- krafty chicks: ATG
- 613 avenue create: ATG
- a bit more time to craft: ATG
- allsorts challengeblog: love
- brown sugar: love/Valentines
- cardmania: love is in the air
- crafty catz: ATG
- crafty gals corner: CAS
- crafty sentiments: ATG
- creative inspirations: lots of love
- cute card thursday: Valentines
- kreativtanten: in my heart
- love to craft: ATG
- my time to craft: all you need is love
- path of positivity: love
- scrapping4fun: love/wedding/Valentines
- male room: ATG with optional twist "love"
- through the craftroom door: ATG
- tuesday throwdown: embossing
- wortartwednesday: ATG
- worldwide open design team challenge: ATG
05 January, 2019
Winter tree
What could be a more embarrassing way to start a new (blog) year than to start it late?
Being away during the Christmas holidays, I somehow assumed that something like this might happen, but I thought I'd still have enough time between Christmas and New Year's to prepare something for the January Fadengrafik Challenge. And as I still have a couple of unused stitching projects in my stash, things should work out in the end...
Needless to say, they didn't. I did find this long forgotten Christmas tree among my unfinished projects that would fit to this month's "winter" theme, but I just couldn't come up with an idea of what to do with it. Finally, I grabbed my new winter/Christmas themed block of patterned papers yesterday, and started to play with different options. In the end, I picked a rather neutral background paper with an ornament of swirls and writings.
Matching the shimmering yarn and the blue pearls I added as I was stitching the tree, I added a layer of shimmering blue paper to the background of the main motif. As the tree itself still looked a little empty, I added a bunch of flower-shaped pearls right into the circles that supposedly represent the festive ornaments. I planned to place another one on top of the tree as well, but it turned out that a simple star is still best suited for this role.
When everything was almost done, I decided to add another layer of paper to make the card more interesting. I'm not sure whether it fits perfectly, but I thought the beige embossed paper would make a good transition between the stitched motif and the pattern in the background. Also, the embossed greenery slightly reminds me of a misteltoe.
And even though I had originally planned to place everything on a white card base, I realized that - since all the papers I used so far were somehoe cream/beige - I didn't like the shiny white in the background. I know it's just a couple of millimeters on each side, but still. As I was trying to find something more suitable, I found that this light blue cardbase could do the trick.
As it was one of those card bases with a cutout in the front, I 'd need to cover up the inside, too, and to make sure it wouldn't be all too patterned and colourful, I decided to stick with the same beige embossed paper that I've already used on the outside.
A little contribution to the December collection of Create in Austria - artwork created by Austrians and/or in Austria.
A little contribution to the collection of hand-stitching at made with Blümchen.
challenges:
- krafty chicks: ATG with optional twist "trees"
- a bit more time to craft: ATG
- alphabet challengeblog: U for use stitching
- as you like it: ATG
- cardmania: baby it's cold outside
- crafting with an attitude: ATG
- crafty catz: ATG
- crafty gals corner: snow much fun
- craftyhazelnutschristmaschallenge: ATG as long as it's Christmas with optional twist "something old" (stitched motif)
- craftyhazelnutspatternedpaper
- creative inspirations: Christmas
- creative moments: ATG
- cute card thursday: ATG
- cutie pie challengeblog: add sparkle
- do-all kreatives: 2 entries
- bawion: winter colours
- everybody art: Christmas
- friendship challenge: ATG with optional twist "New year"
- fussy and fancy: Christmas/New year
- kreativtanten: ATG
- little red wagon: something new (new block of patterned papers)
- love to craft: ATG
- my time to craft: something new (new block of patterned papers)
- pennys papertake: ATG
- 12 months of Christmas: ATG
- male room: blue
- through the craftroom door: ATG
- winter wonderland: snowtime
- wortartwednesday: ATG
- worldwide open design team challenge: ATG
Being away during the Christmas holidays, I somehow assumed that something like this might happen, but I thought I'd still have enough time between Christmas and New Year's to prepare something for the January Fadengrafik Challenge. And as I still have a couple of unused stitching projects in my stash, things should work out in the end...
Needless to say, they didn't. I did find this long forgotten Christmas tree among my unfinished projects that would fit to this month's "winter" theme, but I just couldn't come up with an idea of what to do with it. Finally, I grabbed my new winter/Christmas themed block of patterned papers yesterday, and started to play with different options. In the end, I picked a rather neutral background paper with an ornament of swirls and writings.
Matching the shimmering yarn and the blue pearls I added as I was stitching the tree, I added a layer of shimmering blue paper to the background of the main motif. As the tree itself still looked a little empty, I added a bunch of flower-shaped pearls right into the circles that supposedly represent the festive ornaments. I planned to place another one on top of the tree as well, but it turned out that a simple star is still best suited for this role.
When everything was almost done, I decided to add another layer of paper to make the card more interesting. I'm not sure whether it fits perfectly, but I thought the beige embossed paper would make a good transition between the stitched motif and the pattern in the background. Also, the embossed greenery slightly reminds me of a misteltoe.
And even though I had originally planned to place everything on a white card base, I realized that - since all the papers I used so far were somehoe cream/beige - I didn't like the shiny white in the background. I know it's just a couple of millimeters on each side, but still. As I was trying to find something more suitable, I found that this light blue cardbase could do the trick.
As it was one of those card bases with a cutout in the front, I 'd need to cover up the inside, too, and to make sure it wouldn't be all too patterned and colourful, I decided to stick with the same beige embossed paper that I've already used on the outside.
A little contribution to the December collection of Create in Austria - artwork created by Austrians and/or in Austria.
A little contribution to the collection of hand-stitching at made with Blümchen.
challenges:
- krafty chicks: ATG with optional twist "trees"
- a bit more time to craft: ATG
- alphabet challengeblog: U for use stitching
- as you like it: ATG
- cardmania: baby it's cold outside
- crafting with an attitude: ATG
- crafty catz: ATG
- crafty gals corner: snow much fun
- craftyhazelnutschristmaschallenge: ATG as long as it's Christmas with optional twist "something old" (stitched motif)
- craftyhazelnutspatternedpaper
- creative inspirations: Christmas
- creative moments: ATG
- cute card thursday: ATG
- cutie pie challengeblog: add sparkle
- bawion: winter colours
- everybody art: Christmas
- friendship challenge: ATG with optional twist "New year"
- fussy and fancy: Christmas/New year
- kreativtanten: ATG
- little red wagon: something new (new block of patterned papers)
- love to craft: ATG
- my time to craft: something new (new block of patterned papers)
- pennys papertake: ATG
- 12 months of Christmas: ATG
- male room: blue
- through the craftroom door: ATG
- winter wonderland: snowtime
- wortartwednesday: ATG
- worldwide open design team challenge: ATG
23 December, 2018
Christmas CAS
Shall we squeeze in one last Christmas post just before the holidays?
After creating a different kind of project (nothing major, just wrapping a box in patterned paper), I was left with a stripe of this patterned paper that I just couldn't throw away. Initially, I planned to use its other side that is covered in a soft light blue snowflake pattern, and the card I had in mind would be some kind of a classic white/blue/silver Christmas card with pieces of patterned paper, maybe a focal image, a couple of pearls...
Cutting the stripe in 3 pieces seemed a logical decision as it a) just worked out and b) the piece of paper wasn't that big altogether, so I thought the only use would be to use pieces of it on a card ADDITIONALLY to other embellishments.
As I had no proper idea though, I put the whole project aside, until I noticed that the other side of the cutouts had a quite interesting pattern, too. By chance, the Christmas ornaments were arranged in a way that there was one of them on each paper piece, and soon I began to play with the option of using this as the focal point of my card. No classic white/blue/silver thing with embellishments, just a plain kraft card base with three paper cutouts in a row, and a golden sticker saying Merry Christmas.
Needless to say, things didn't work out like that in the end. After gluing the pieces of patterned paper on golden cardboard, I thought it might look a little more vivid if I arranged them diagonally across the card.
Obviously, there would be no place left for the Christmas message, but I thought I might as well use something else from my stash: a couple of leftover golden border stickers. As they were leftovers, they would differ in length and style, and if I arranged them randomly on the card base, they might even look like pieces of lametta. Said and done:
Even though I considered using 3D pads for the paper pieces, I decided to go without in the end as the golden cardboard is pretty thick and I didn't want to build up too much of a 3D effect considering the golden stickers in the background.
challenges:
- 4 crafty chicks: ATG
- 613 avenue create: ATG
- a bit more time to craft: ATG
- as you like it: ATG
- C.R.A.F.T.: ATG
- cardmania: Christmas
- craft-alnica: holidays
- crafting with an attitude: ATG
- crafty calendar: Christmas time
- crafty sentiments: celebrate
- craftyhazelnutschristmaschallenge: ATG as long as it's Christmas
- craftyhazelnutspatternedpaper
- creative inspirations: feeling festive
- creative moments: ATG
- cute card thursday: ATG
- cutie pie challengeblog: add sparkle
- do-all kreatives: Christmas/New year
- everybody art: Christmas
- friendship challenge: ATG
- fussy and fancy: Christmas/New year
- little red wagon: all things Christmas
- love to craft: ATG
- pennys papertake: ATG
- scrapping4fun: Christmas
- 12 months of Christmas: ATG
- through the craftroom door: ATG
- winter wonderland: ATG Christmas
- wortartwednesday: ATG
- worldwide open design team challenge: ATG
After creating a different kind of project (nothing major, just wrapping a box in patterned paper), I was left with a stripe of this patterned paper that I just couldn't throw away. Initially, I planned to use its other side that is covered in a soft light blue snowflake pattern, and the card I had in mind would be some kind of a classic white/blue/silver Christmas card with pieces of patterned paper, maybe a focal image, a couple of pearls...
Cutting the stripe in 3 pieces seemed a logical decision as it a) just worked out and b) the piece of paper wasn't that big altogether, so I thought the only use would be to use pieces of it on a card ADDITIONALLY to other embellishments.
As I had no proper idea though, I put the whole project aside, until I noticed that the other side of the cutouts had a quite interesting pattern, too. By chance, the Christmas ornaments were arranged in a way that there was one of them on each paper piece, and soon I began to play with the option of using this as the focal point of my card. No classic white/blue/silver thing with embellishments, just a plain kraft card base with three paper cutouts in a row, and a golden sticker saying Merry Christmas.
Needless to say, things didn't work out like that in the end. After gluing the pieces of patterned paper on golden cardboard, I thought it might look a little more vivid if I arranged them diagonally across the card.
Obviously, there would be no place left for the Christmas message, but I thought I might as well use something else from my stash: a couple of leftover golden border stickers. As they were leftovers, they would differ in length and style, and if I arranged them randomly on the card base, they might even look like pieces of lametta. Said and done:
Even though I considered using 3D pads for the paper pieces, I decided to go without in the end as the golden cardboard is pretty thick and I didn't want to build up too much of a 3D effect considering the golden stickers in the background.
And with this simple gold & brown CAS card, I'm probably going to finish posting for this year. I still do have a couple of things to show and tons of ideas on my mind, but on the other hand, I just can't get rid of the feeling that I'm running out of time on several different levels.
Doing things and not getting anything done, planning and being out-planned... I certainly hope 2019 will be way more organized, and predictable, and full of successfully finished projects!
A little contribution to the December collection of Create in Austria - artwork created by Austrians and/or in Austria.challenges:
- 4 crafty chicks: ATG
- 613 avenue create: ATG
- a bit more time to craft: ATG
- as you like it: ATG
- C.R.A.F.T.: ATG
- cardmania: Christmas
- craft-alnica: holidays
- crafting with an attitude: ATG
- crafty calendar: Christmas time
- crafty sentiments: celebrate
- craftyhazelnutschristmaschallenge: ATG as long as it's Christmas
- craftyhazelnutspatternedpaper
- creative inspirations: feeling festive
- creative moments: ATG
- cute card thursday: ATG
- cutie pie challengeblog: add sparkle
- do-all kreatives: Christmas/New year
- everybody art: Christmas
- friendship challenge: ATG
- fussy and fancy: Christmas/New year
- little red wagon: all things Christmas
- love to craft: ATG
- pennys papertake: ATG
- scrapping4fun: Christmas
- 12 months of Christmas: ATG
- through the craftroom door: ATG
- winter wonderland: ATG Christmas
- wortartwednesday: ATG
- worldwide open design team challenge: ATG
13 December, 2018
Love & fairy dust
Just a quick post today, to present what I've been working on lately.
To use up some things that accumulated in my stash, I recycled this cardboard box that once contained bullet-proof glass film for my phone. As the box itself looked quite stable, I didn't want to throw it away, thinking I might as well use it in one of my future projects, and this is what I came up with:
The patterned paper might be familiar to you as I've used it before to cover up my pen storage, and the fairy is in fact what remained from the sheet of paper after the pen box was done.
Luckily, the magical creature - alongside with the butterfly by her side - has just the right size to fit on the box lid (except for her toes), and as such doesn't need much of additional embellishments.
In fact, I thought I'd leave it as it is, but then I was already digging through my treasures for a little something to add. My first thought was using some lace o ribbon, but in the very end I remembered this huge gemstone swirl that I received from scrapping4fun ages ago. It was too big to use it on my cards, and as I didn't want to cut it into pieces, it tremained inn my stash.
Now, however, it turned out to be perfect to add a little fairy magic, and, to be perfectly honest, I was also happy to cover up the fairy a little bit as the image itself looks a *little* bit too sexy to me. I understand it would be perfect for some guy project, but as I didn't want to restrict the circle of recipients in the first place, I thought I'd make it a little bit more family friendly :)
As shimmering as the box lookds on the outside, I decided to keep the inside plain and simple. On the inner front lid, I placed another layer of the fairy paper...
... while the first thing to do on the other side was covering up the glass film instructions that were printed on cardboard. Once I placed rice paper over the whole area, I added two pieces of shimmering paper to create pockets. I punched their borders with a decorative punch and placed some tiny pearls on the ornament.
After that, I cut out one of the fairy messages from the paper block, enhanced it with another layer of background paper, and decorated it with a tiny bow. For a personalized message, I placed a bigger piece of white paper on shimmering background paper, and cut a little ornament in one border here as well.
To spare me from cutting the tiny oval shape to cover the entire cardboard surface, and still make sure the entire inside area is covered, I added three pearls from my stash.
I'm not yet sure who is going to receive the magical message, so I just put it aside for a while. However, upon doing so, I couldn't help noticing that the big silver swirl might not be fairy magic at all. In fact, considering the way I placed it over the image, it might as well be a giant, shimmering fairy fart. Ooops!
A little contribution to the December collection of Create in Austria - artwork created by Austrians and/or in Austria.
challenges:
- 613 avenue create: ATG
- a bit more time to craft: ATG
- butterfly challenge: fairy
- C.R.A.F.T.: ATG
- crafting with an attitude: ATG
- craftyhazelnutspatternedpaper
- creative moments: ATG
- cutie pie challengeblog: add sparkle
- friendship challenge: ATG
- love to craft: ATG
- morgans artworld: ATG
- pennys papertake: ATG
- through the craftroom door: ATG
- wortartwednesday: ATG
To use up some things that accumulated in my stash, I recycled this cardboard box that once contained bullet-proof glass film for my phone. As the box itself looked quite stable, I didn't want to throw it away, thinking I might as well use it in one of my future projects, and this is what I came up with:
The patterned paper might be familiar to you as I've used it before to cover up my pen storage, and the fairy is in fact what remained from the sheet of paper after the pen box was done.
Luckily, the magical creature - alongside with the butterfly by her side - has just the right size to fit on the box lid (except for her toes), and as such doesn't need much of additional embellishments.
In fact, I thought I'd leave it as it is, but then I was already digging through my treasures for a little something to add. My first thought was using some lace o ribbon, but in the very end I remembered this huge gemstone swirl that I received from scrapping4fun ages ago. It was too big to use it on my cards, and as I didn't want to cut it into pieces, it tremained inn my stash.
Now, however, it turned out to be perfect to add a little fairy magic, and, to be perfectly honest, I was also happy to cover up the fairy a little bit as the image itself looks a *little* bit too sexy to me. I understand it would be perfect for some guy project, but as I didn't want to restrict the circle of recipients in the first place, I thought I'd make it a little bit more family friendly :)
As shimmering as the box lookds on the outside, I decided to keep the inside plain and simple. On the inner front lid, I placed another layer of the fairy paper...
... while the first thing to do on the other side was covering up the glass film instructions that were printed on cardboard. Once I placed rice paper over the whole area, I added two pieces of shimmering paper to create pockets. I punched their borders with a decorative punch and placed some tiny pearls on the ornament.
After that, I cut out one of the fairy messages from the paper block, enhanced it with another layer of background paper, and decorated it with a tiny bow. For a personalized message, I placed a bigger piece of white paper on shimmering background paper, and cut a little ornament in one border here as well.
To spare me from cutting the tiny oval shape to cover the entire cardboard surface, and still make sure the entire inside area is covered, I added three pearls from my stash.
As both pieces of paper can be removed from their pockets, and since I decided to keep the foamy boundary, there's enough place to hide an additional "something" inside the box - money, a letter, a piece of jewelry...
For the back side, I decided to go with the patterned paper again, adding one last remaining swirl from my stash. And even though I thought about painting the brown cardboard with (silver?) acrylic paint, I decided to leave it like this in the end.I'm not yet sure who is going to receive the magical message, so I just put it aside for a while. However, upon doing so, I couldn't help noticing that the big silver swirl might not be fairy magic at all. In fact, considering the way I placed it over the image, it might as well be a giant, shimmering fairy fart. Ooops!
A little contribution to the December collection of Create in Austria - artwork created by Austrians and/or in Austria.
challenges:
- 613 avenue create: ATG
- a bit more time to craft: ATG
- butterfly challenge: fairy
- C.R.A.F.T.: ATG
- crafting with an attitude: ATG
- craftyhazelnutspatternedpaper
- creative moments: ATG
- cutie pie challengeblog: add sparkle
- friendship challenge: ATG
- love to craft: ATG
- morgans artworld: ATG
- pennys papertake: ATG
- through the craftroom door: ATG
- wortartwednesday: ATG
Subscribe to:
Posts (Atom)