30 December, 2022

Thank you

Hello and welcome to what will probably be my last post of the year. We're having a new challenge over at the Alphabet challenge blog, and our theme this fortnight is "Thank you". I think it's a fantastic match for the tradition of drawing the balance at the end of the year, and I hope that when you look back at 2022, you can find many things to be thankful for. 

I for myself have the feeling that this year has flown by like no other. I managed to make some progress in certain areas, but I feel like I'm forever stuck in others, and since I'm still not able to catch up with my life, it's more like going from one day to another without a knowing what will be around the corner. And I see that while not making plans is a wonderful fantasy when it comes to holidays or a limited time off, not being able to plan things can be quite disturbing in everyday life when you simply don't know how you're going to feel two days from now. 
Anyway, while I'm still far from any predictable routine, I try to keep myself busy with smaller tasks like crafting. Being on a DT certainly helps as you "have" to produce something every now and then, and for my "Thank you" project, I had indeed planned out everything. I didn't have the final concept of what I'd like to do, but I had a couple of ideas and I thought I'd just sit down and see which one attracts me most. The problem being: I kind of missed my crafting day. See, I was certain that I had another day to go in the week after Christmas, and this day would be my day to get crafty. However, when I awoke to what I thought would be my crafting day, I realized that I'd have to upload my DT project within a couple of hours. Where did the time go, and how I could spend the entire week thinking I'd still have a day to spare - I have no idea! 
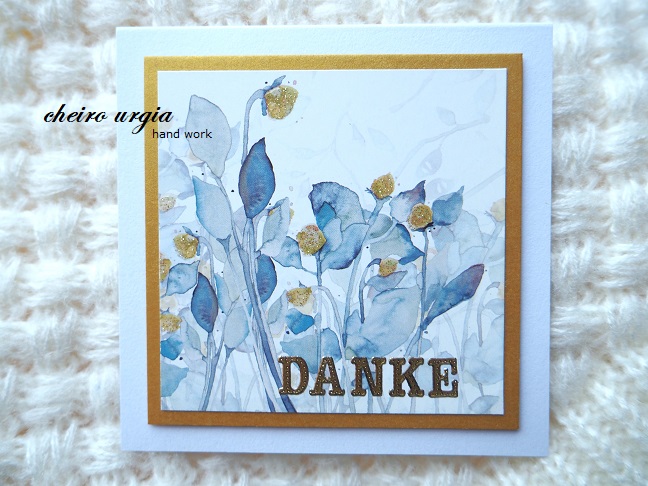
What I knew was that my best option was checking if I can find some unfinished projects in my stash. Otherwise, I'd just have to admit defeat and skip the challenge. Luckily, I found this half-finished mini card in my project pile: I have cut the image of golden blooms ages ago from an album cover, and I decided to glue it onto a golden background paper for a bit more bling. I then used 3D adhesive pads to place everything on one of those 9 x 9 cm card bases that are suitable to add to a bouquet or a chocolate box. Once that was done, the half-finished card ended up in my stash. 
With the time running out, I've re-discovered this tiny card, and I decided to bring it to life. I didn't want to print a "Thank you" sentiment because I thought another layer of paper would take attention away from the golden blooms. Instead, I created a single word of thanks by placing golden stickers directly onto the card. They are a nice match to the golden elementst of my card, however, due to bad lighting conditions the photos don't do them justice. I hope you still have an idea of how the card looks in real life: bright, white, with green watercolour-like foliage and golden accents.

16 December, 2022

Snow

Hello and welcome to another challenge over at the Alphabet challenge blog. We have arrived at the letter "S" today, and matching the winter season, we'd like to see "Snow" on your projects. Remember, you can link up any kind of creations as long as they feature some form of snow.
For my DT card, I opted for a quick & easy holiday card. The background paper with snowflakes in different shades of blue comes from a magazin of the Czech railways. It was part of one of their winter ads last year, and I knew I'd like to incorporate it in my crafting as soon as I saw it.
Last week, I finally got to use it: I placed those beautiful snowflakes on top of a blue sheet of paper and then glued everything onto a slimline card base. After that, I printed a simple sentiment saying "Happy holidays", and cut a piece of silver paper to go with it. I then placed the winter wishes where the railway logo used to be (which is why it's placed in such a weird position - not in the center, not in the corner). Since I made a tear in the right upper corner of the sentiment white cutting, I had to cover that part somehow. I found some white plastic snowflakes in my stash, which seemed to be the perfect solution. To make the snowflakes look a bit more planned, I placed some of them onto my card as well. 
Since it still looked a bit empty and flat, I added a couple of pearls in white, blue, and grey. I think they really do bring the card together alongside the 3D snowflakes.
That's about it from me, I thought I'd make some errands today but somehow ended up in bed. Hopefully tomorrow will be a better day, and as I heard we might be getting a load of snow. In the meantime, don't forget to visit my DT peers to check out what they have prepared for you, and I'm sure you'll be able to draw some inspiration for your own crafting. 

challenges:
krafty chicks: CAS
613 avenue create: ATG with optional twist "up in the sky"
a place to start: ATG with optional twist "happy holidays
"
as you like it: ATG Christmas
C.R.A.F.T.: ATG
craft-alnica: 15-minute NY card
crafty calendar: ATG
crafty gals corner: tis the season
craftyhazelnutschristmaschallenge: ATG as long as it's Christmas (optional twist "quick & easy")
creative crafty uncles: Christmas and/or Happy New Year
creative moments: ATG with optional twist "Christmas/winter celebrations"
fabnfunky: last-minute Christmas
friendship challenge: Christmas time
intaas: winter
kreativtanten: Christmas slimline
 
make my monday: winter card, not Christmas
morgans artworld: ATG
moving along with the times: Christmas
my time to craft: other December celebrations (New Year)
pennys papertake: ATG
scrapping4fun: Christmas
12 months of Christmas: ATG with optional twist "patterned paper"

02 December, 2022

Reduce (make it CAS)

Hello and welcome to another task of the Alphabet challenge, I'm your host tonight and I'll be picking the winners, too, so you're more than welcome to play along. To make sure you have plenty of creative freedom, I've chosen a rather simple "Reduce" theme, which can also be translated as "make it CAS", meaning that I'd like to see simple designs on your projects this fortnight. I'm sure you'll enter loads of winter/Christmas related cards, but in fact you can work with any occasion you like, and it doesn't have to be a card either. Without further ado, here's my DT inspiration for the CAS challenge (the lighting has been horrible in the past couple of days due to clouds & rain, but I'd like you to imagine an overall bright card with no weird shadows and/or grey tones). 
I knew that my challenge would be placed in the winter/Christmas time, but nevertheless, I decided to create a sympathy card. Or rather: I saw this motif of a falling feather on the cover of one of my scrapbook albums, and as I went along with it, this sympathy card happened. I didn't want to throw this beautiful motif away, so I carefully extracted it from the album cover. However, after I removed all the words, it ended up being this weird size - too narrow for a regular card base, and too small for a slimline. I solved the issue by adding an additional layer of light lilac paper. It doesn't show very well in the pictures, but the lilac colour goes well with the feather, and the lilac paper itself has a subtle shimmer. 
Since the feather is quite high on the card, I decided to surround it by a couple of tiny gemstones. Then I placed a sentiment in the lower part of the card base. I worked with a simple condolence message which I framed with a tiny piece of silver shimmering paper. 
What do you think of the result? Shimmer might be a weird flex on a sympathy card, but I thought it would complement the motif of a feather, which was the main reason why I used the paper in the first place. I understand that not everybody might be comfortable with a shimmering condolence card, but I thought there might be people who like it. Also, I tried to incorporate the glitz it in a very small amount while leaving lots of empty space in my card, so that the main focus would be on the falling feather, the subtle branches in the background, and the emptiness that remains when somebody passes away.

challenges:

18 November, 2022

DIY card

Just a quick post from me today to introduce the newest challenge over at the Alphabet challengeblog. We're getting closer to the tricky letters of the alphabet, but don't worry - Q is an easy one with a "Quilt" theme. I didn't know what to create since I don't have any stencils or dies, and I didn't want to do any cutting by hand. In the end, I remembered I had some sort of quilt-papers in my stash. I opted for a sheet with hexagons in an autumn-ish colour scheme with different patterns and blooms, cut it to the right size and placed it onto a kraft card.
Then, I began to think about something that would go with the colourful background. I had an extra print of the Mirtillamente mushroom house still on my desk, and even though I didn't plan to use the digi that I've just shown in another project, I think it fits well with the current season. 
However, I decided to leave it blank for different reasons. For one, I simply didn't have much time left since I've been in and out of hospital again, and only began to prepare my card shortly before the due date. Colouring would take a while, and since I have other things going on, too, I felt like I wouldn't make it. Other than that, I always wanted to create some kind of DIY card, a card with a blank digi as a centerpiece. I had the scenario in my mind of finishing the card with everything from papers and embellishments, and just leave it to the recipient to colour the main motif - or leave it blank if they prefer so. 
And since the card was pretty colourful thanks to the quilt background, I added a piece of yellow cardboard to frame the image. After that, I added a couple of wooden leaves from my stash. What do you think of a DIY card, is it something you'd consider giving away? Or does it look like an unfinished project? Could this kind of deliberate emptiness be useful in background patterns that are super vibrant which sometimes makes it difficult to find the right colours for the digi? Or is the purpose of an image to always be coloured, no matter what? I'd love to hear your feedback on this as I've never created anything like that and I'm not sure yet how to feel about it. 

challenges:

16 November, 2022

Mushroom house

I'm here for a quick post today to show you the card I've created for the latest challenge at the Mirtilamente challenge blog. I won some of their digis in one of the recent challenges over at the Creative Moments challenge blog, and I was invited to be a GD for the sponsor's own November challenge in addition to the digis. I understand there will be no November challenge due to unforeseen circumstances, but I think it would be a shame to not show you my creation anyway. The only requrement for my GD task was to use one of the sponsor images I won, and I went for this lovely image of a mushroom house - such a perfect image for the season!
I coloured the digi with coloured pencils, and picked some whimsical papers for the background. Since the leftover green paper was a little bit too narrow for the card base, I decided to improvise by cutting it in half in order to be able to place it on the outside of the card at least. I was left with a gap in the middle, which I covered up using a strip of dark brown paper with a swirly pattern. 
I then added a simple birthday message which I placed onto a piece of brown cardboard. In the end, I tried to placed a couple of green rhinestones onto my creation. I needed a few attempts until I was satisfied with their position, but I think I'm happy with how everything turned out.

04 November, 2022

Precious

I can't believe we're turning another page on our calendar already! We want to see "Precious" projects this fortnight, and as always, you're more than welcome to join and show us your interpretation of the challenge theme on the Alphabet challenge blog. Since I've been quite busy lately, I'll show you a card that I've created a while ago. It's a welcome card for a little Ukrainian refugee that went into a care package for a baby that has been or will be born far away from home. 
I can imagine that the arrival of a new baby brings many emotions to the family, a mix of wonderful expectations and joy as well as different fears and insecurities. However, I cannot possibly imagine the stress of fleeing your home land with a newborn in tow, or leaving your home while being pregnant to birth your child in a foreign land, not knowing when you'll be able to return home, let alone whether there'll be a home waiting for you upon your return. 
To make the start a bit easier for one little child at least, I packed a box with the most necessary baby items. As with my other boxes, I decided to include a little welcome card, too.
Not knowing the baby's gender, I decided to make it neutral and working with a sunflower motif instead. I stitched the pattern and embroidered it using a pastel yellow yarn. I added a bit of depth by colouring the image with coloured pencils. Then, I added a sentiment saying "Welcome" which I placed onto a brown piece of cardboard since I wanted it to blend with the center of the sunflower. 
After that, I placed everything onto a layer of soft blue background to resemble Ukrainian skies. This way, I'd be able to recreate the colours of the Ukrainian flag, even though in a slightly pastel version. 
In the very end, I added a tiny wooden ladybug for good wishes and good luck. For Ukraine to win this war. for people to return home and be reunited with their loved ones. For babies to be born into happy families, for children to play in endless sunflower fields of their independent country. 

21 October, 2022

Outer space

We're starting a new challenge over at the Alphabet challenge blog, and with the letter O, we'd like to see "Outer space" in your creations. Show us your un-earthy projects to play along, I'm sure you'll come up with plenty ideas to get creative this fortnight.
I for myself had an eye on this cute astronaut for quite some time. It's a Bugaboo digi (obviously!), and I decided to use him to create a quick & fun card. First of all, I selected a couple of papers that would go with my image: to match the space theme, I picked a starry background paper. I then added a layer of yellow to go with the stars, and one additional layer of dark blue to enhance the astronaut image. To make it a bit more playful, I used corner punches which I thought would give a nice effect to the overal look of my card. 
I then coloured the digi with coloured pencils, and placed the various papers onto the card base. I flipped the astronaut image a bit to create some sort of movement, and added a bit of sparkle by using two star-shaped gemstones.
How do you like the little astronaut? I certainly hope he'll inspire you to play along this fortnight!

challenges: 

07 October, 2022

Nature

After a short break, I'm back with another card for you. I skipped the "Magic" challenge over at the Alphabet challenge blog, and now jump right into our next task which is "Nature". I couldn't decide which part of nature I should focus on, so I featured a bit of everything here.
For the main motif, I picked a cute badger (or is it a skunk?) drawing by Nina Štajner. I cut it from the cover of a paper set that was too beautiful to be thrown away, and decided to place it on a green-ish background paper which I purchased recently. I like how it looks like a green and brown watercolour painting without any specific pattern, and I think this alone makes it suitable for many different occasions. I added another little piece of green paper, and placed the badger onto a layer of black cardboard. An odd choice maybe, but I think the black goes well with the animal itself, and makes sure that the picture stands out from the background. Additionally, I placed the badger on 3D adhesive pads.
Once the outline was done, I added a couple of paper flowers, as well as pearls in different colours and sizes. I think they complement the watercolour-like drops in the background, and give a nice 3D effect as well.

challenges: 
613 avenue create: ATG
a place to start: ATG with optional twist "circles and squares
"
basteltraum: autumn
crafty catz: ATG with optional twist "autumn colours"
crafty gals corner: signs of fall
creative inspirations: autumn
creative moments: ATG with optional twist "autumn colours"
critter crazy: ATG animals
double D challenges: everything October
everybody art: autumn magic
love to craft: ATG 
make my monday: autumn flora and fauna
nachteulen: it runs and crawls
path of positivity: celebrate something about your favourite season (I don't really have a favourite season as such, but I try to find good things in every part of the year. In autumn, it's warm sunny days and colourful leafs which make up for the fact that the temperatures are sinking and I have to keep adding layers to my clothing in order to keep warm as soon as the sun is gone.)

09 September, 2022

Leaves

Another Friday, another task over at the Alphabet challenge blog. We have reached the letter "L", and fitting for the upcoming fall season we'd like to see "Leaves" on your projects. 
I've created a simple card reusing the cover of a Nina Štajner scrapbook paper set, since it would be a shame to throw it away. Instead, I decided to cut out a piece of paper that features branches and falling leaves. 
With a simple and serene motif like this, I created a simpathy card. I placed the paper piece onto a kraft card base, complementing it with a simple sentiment of condolence which I enhanced with a strip of dark brown paper. I like to believe that despite of the warm colours being used, the card is still acceptable for a sad occasion. But then again, I might be a weirdo :)
Other than that, I decided to leave the illustration as it is. I even restrained myself from adding tiny pearls, because I think those branches don't need any additional bling. 

challenges: 

26 August, 2022

Kraft card

Just a quick card from me today, featuring a kraft card base as is required for our newest challenge over at the Alphabet challengeI've dismantled the cover of a scrapbook paper album recently since I didn't want to just throw it away. I decided to prepare scraps for a couple of cards, but since it featured different motifs on the inside and outside, I had to sacrifice one side to use the other and vice versa. However, I managed to prepare pieces from both sides to be used. This particular scene is from the inside of the cover, and I like those abstract, watercolour-looking flowers. While the foliage is rather blurry, it has a beautiful accent in form of golden blooms. 
I cut a piece wide enough to be featurred on a card base, but since the floral motif interfered with other stuff, it wasn't quite tall enough for me. To make it appear bigger, I added a punched strip of golden paper which goes with the golden dots of the image. I wasn't sure whether the finished card would be suitable for a masculine occasion or a short "just because" note, but in the end I decided to use it for a sympathy card - the main reason being that the motif looks so serene to me. I then added a small sentiment on dark turquoise paper, and couldn't resist adding a couple of rhinestons in the end.  
I'm not entirely sure whether the outcome is appropriate for a sympathy card, but I like to believe that somebody will like to have one that is not entirely black & white. I try to tell myself that the golden accents are quite discrete, and the gemstones are almost invisible as if they would resemble fireflies above a meadow on a warm summer evening...
... but I'd really like to hear your thoughts on this one. Would you think of making a sympathy card like this? Would you buy it if you saw it in the store? How would you feel about receiving a bit of gold and glitter on a sad occasion?

12 August, 2022

Juvenile

Can you believe two weeks have passed already since our last challenge over at the Alphabet challenge blog? Time to announce a new challenge, I guess. We'd like to see your "Juvenile" themed projects this fortnight, meaning you should create something for a young person.
For my DT inspiration, I've worked on something very simple: a birthday card for a young vehicle enthusiast. You certainly know the patterned paper as I've used it in a couple of masculine projects already, and this one is actually a leftover piece. I've cut out the motif of cars in the middle to use them for one of my bookmarks. I figured I'd fill the emptiness with a greeting or sentiment to create an extra card (I didn't want to create any more bookmarks), which is why I placed the patterned paper onto a bright yellow card base. However, I always thought about placing a sentiment over the yellow gap in the middle. This way, whatever I'd place atop that base would have to be rather big, possibly interfering with all the vehicles in the background and making them look inaproppriately small. Since I couldn't come up with anything better, I put my half-finished project aside. I came across it every now and then, and each time it ended up annoying me because I just couldn't come up with a solution. Until I decided to completely change my thought process.
Only a couple of days ago it struck me that I don't necessarily need to cover up the awkward gap - I could make it the centerpiece of my creation! I rearranged the sentiment from my recent summer card and cut it to the right size to match the card base. I then removed the piece of yellow card base that was acting as a gap-holder the entire time, creating an opening instead.
See, instead of putting the greeting atop my card, I decided to place it inside, and I think it gives such an unexpected twist to the original outline. I actually like how everything turned out, and how it all was possible because I changed my way of thinking by looking for the exact opposite of what I had in mind before. A concept that might as well be useful in everyday life.

challenges:

31 July, 2022

Children of war

I visited my sister mid March and the train journey offered a glimpse of the ongoing refuge stream from Ukraine. People on the way to safety, each carrying the weight of the world while their actual world is falling apart. 
A woman with kids and an elderly grandma in tow, navigating Europe with a piece of paper with a single word written on it: the name of foreign city. Is it a stopover or a permanent home with friends/relatives who already live here? Who knows.
Babies crying from hunger and exhaustion on a train station as their mothers are trying to find an info point after being on the road for who knows how long. 
A family with several kids, all well behaved and quiet for hours as the train takes them further and further away from everything they've ever known. 
A woman with kids, each carrying their life in a small backpack, looking for a way to continue their journey despite the language barrier. Where are they going to and what have they left behind? Who knows.

Months have passed and the headlines have changed, but I can't help feeling more and more appalled by the evil that is being unleashed on Ukrainian soil. We might go on with our lives, but innocent people are still being terrorized on a daily basis. While we know of hundreds of children who have been killed and injured, we seem to forget that every Ukrainian child has been affected by this war in one way or another: by losing friends and/or family members, having teir schools and playgrounds bombed, spending nights in bomb shelters, feeling the insecurity of the adults without understanding what is going on, leaving their homes behind, ending up in a strange place surrounded by strange people. It doesn't take a physical injury to be injured, and I'm afraid the wounds of Ukrainian children will take decades to heal.

To make at least one child feel welcome and safe, I wrapped up a care package. Next to everyday items I included a "Welcome" card and a few girly things since the box would be sent to a girl. Not knowing any details of the child (age, interests), I tried to make a card as fitting as possible for anyone. First, I picked this wonderful polka dot background paper. It might be very blue for a girl, but I think it's a fun one nevertheless, and besides that there's no reason why blue should be attributed exclusively to boys. 
Once I finished the background, I started wotking on the main motif. I thought about using a digi, a picture, or a "Welcome" sentiment, but I went with butterfly stickers in the end. I like how they're made in 3D which gives the card a bit of a depth. They do add more blue to the card, but there's also a bit of shimmer, and I figured a bunch of butterflies would be a nice gift to a child who ends up in a strange country far away from home. I placed the stickers onto a plain white cardboard and that was about it.
As I tried to reflect Ukrainian colours on my creation, I decided to add more yellow in form of a light yellow card board which enhances the butterflies. Once I placed the motif on 3D pads, the card was done. There's no sentiment because I thought I'd let the butterflies shine without any additional embellishments.

challenges:
krafty chicks: all occasions
613 avenue create: ATG  
allsorts challengeblog: butterflies/bugs
craft-alnica: for a young lady
creative moments: ATG with optional twist "cute"
cutie pie challengeblog: little cuties
fabnfunky: ATG
intaas: happiness
love to craft: ATG 

29 July, 2022

Interests

May I interest you in another task over at the Alphabet challenge blog? 
I'm sorry I couldn't help, but this pun was absolutely intended. Jokes aside, we'd like to see "Interests" in your creations this fortnight, and by that we mean everything related to interests and hobbies. It could be your personal hobbies or hobbies in general, everything is fine as long as you make that the main topic of your project.
For my DT inspiration, I prepated a card which features two of my interests actually. The first one is paper embroidery which is displayed in form of a stitched border. I created it using one of my favourite stitching patterns and silver yarn. I've worked on it two days in a row, and once it was done, I decorated the swirls with a couple of rhinestones. I placed the embroidered piece of paper onto a light blue background paper, and that was that. 
My second interest is cycling, which is represented by the image of two bicycles on a beach. The original photo was featured in one of those desk calendars with serene images and wisdoms, and I saved the photo of two bicycles on a beach to use it in one of my future projects. I cut out a detail of the whole piece and adjusted the size in order to make it fit inside the embroidery once the border was done. 
Now, I'm no cyclist by all means. I used to ride my bike as a child, but it would mostly be short trips with family. However, me and my sister used to be a huge cycling nut years ago, following every move of Lance Armstrong and the team USPS/Discovery/Astana/RadioShack up to the point that I could recognize the riders based on their socks and sunglasses. Going to races became as obligatory as painting the streets with encouraging messages and getting to know the team-members we'd meet regularly. I'm not sure what they must have been thinking about those crazy girls who'd patiently wait next to the team vehicles for hours only to get a glimpse at the athletes, but friendly chit-chats, merch giveaways and even rides in the team car suggest that we must have done a really good job as fans. I'm not a hardcore fan like that anymore - mostly due to the fact that the riders I originally supported are more or less retired and I haven't found myself proper replacements in form of other riders/teams. However, even though my interest for cycling has faded over the years it never really went away. I'm still following cycling news and race results (even though not as frequently), and I'm still over the moon when my favourite riders do well (and since favourite now equals Slovenian, it means I've been over the moon many times in the past couple of years). 
Since the card as such sends off holiday vibes, I originally wanted to present it for my "Holidays" challenge theme, but I had run out of time to create the stitched border. I'm happy to be able to show you the card in this challenge instead, and hope you'll be able to get inspired by the works of the DT.
A little contribution to the collection of hand-stitching at made with Blümchen.

challenges: 
krafty chicks: all occasions
basteltraum: ATG
cardz4guyz: recycle something (picture from an old calendar)
fabnfunky: ATG
friendship challenge: summer, sun, beach
intaas: masculine
little red wagon: stitching
love to craft: ATG 
make my monday: outdoor sports
my time to craft: ocean/sea (beside/on/under water)