23 December, 2018

Christmas CAS

Shall we squeeze in one last Christmas post just before the holidays?
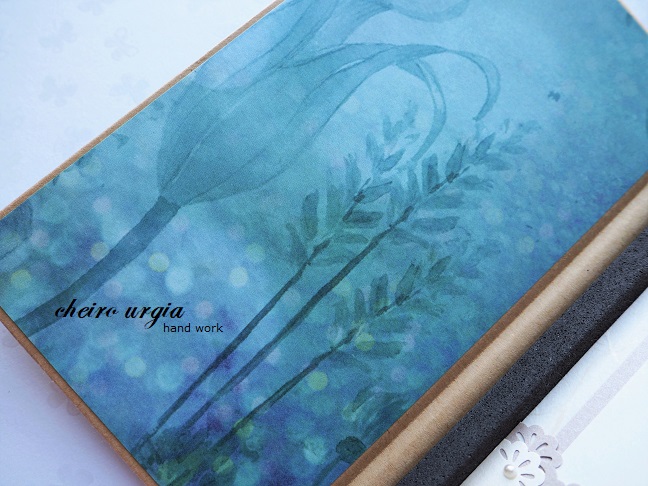
After creating a different kind of project (nothing major, just wrapping a box in patterned paper), I was left with a stripe of this patterned paper that I just couldn't throw away. Initially, I planned to use its other side that is covered in a soft light blue snowflake pattern, and the card I had in mind would be some kind of a classic white/blue/silver Christmas card with pieces of patterned paper, maybe a focal image, a couple of pearls...
Cutting the stripe in 3 pieces seemed a logical decision as it a) just worked out and b) the piece of paper wasn't that big altogether, so I thought the only use would be to use pieces of it on a card ADDITIONALLY to other embellishments. 
As I had no proper idea though, I put the whole project aside, until I noticed that the other side of the cutouts had a quite interesting pattern, too. By chance, the Christmas ornaments were arranged in a way that there was one of them on each paper piece, and soon I began to play with the option of using this as the focal point of my card. No classic white/blue/silver thing with embellishments, just a plain kraft card base with three paper cutouts in a row, and a golden sticker saying Merry Christmas. 
Needless to say, things didn't work out like that in the end. After gluing the pieces of patterned paper on golden cardboard, I thought it might look a little more vivid if I arranged them diagonally across the card. 
Obviously, there would be no place left for the Christmas message, but I thought I might as well use something else from my stash: a couple of leftover golden border stickers. As they were leftovers, they would differ in length and style, and if I arranged them randomly on the card base, they might even look like pieces of lametta. Said and done:
Even though I considered using 3D pads for the paper pieces, I decided to go without in the end as the golden cardboard is pretty thick and I didn't want to build up too much of a 3D effect considering the golden stickers in the background.
And with this simple gold & brown CAS card, I'm probably going to finish posting for this year. I still do have a couple of things to show and tons of ideas on my mind, but on the other hand, I just can't get rid of the feeling that I'm running out of time on several different levels. 
Doing things and not getting anything done, planning and being out-planned... I certainly hope 2019 will be way more organized, and predictable, and full of successfully finished projects!
A little contribution to the December collection of Create in Austria - artwork created by Austrians and/or in Austria.

challenges:
4 crafty chicks: ATG
613 avenue create: ATG
a bit more time to craft: ATG
as you like it: ATG
C.R.A.F.T.: ATG
cardmania: Christmas
craft-alnica: holidays
crafting with an attitude: ATG
crafty calendar: Christmas time
crafty sentiments: celebrate
craftyhazelnutschristmaschallenge: ATG as long as it's Christmas
craftyhazelnutspatternedpaper
creative inspirations: feeling festive
creative moments: ATG
cute card thursday: ATG
cutie pie challengeblog: add sparkle
do-all kreatives: Christmas/New year
everybody art: Christmas
friendship challenge: ATG
fussy and fancy: Christmas/New year
little red wagon: all things Christmas
love to craft: ATG 
pennys papertake: ATG
scrapping4fun: Christmas
12 months of Christmas: ATG
through the craftroom door: ATG
winter wonderland: ATG Christmas
wortartwednesday: ATG
worldwide open design team challenge: ATG

13 December, 2018

Love & fairy dust

Just a quick post today, to present what I've been working on lately. 
To use up some things that accumulated in my stash, I recycled this cardboard box that once contained bullet-proof glass film for my phone. As the box itself looked quite stable, I didn't want to throw it away, thinking I might as well use it in one of my future projects, and this is what I came up with: 
The patterned paper might be familiar to you as I've used it before to cover up my pen storage, and the fairy is in fact what remained from the sheet of paper after the pen box was done. 
Luckily, the magical creature - alongside with the butterfly by her side - has just the right size to fit on the box lid (except for her toes), and as such doesn't need much of additional embellishments. 
In fact, I thought I'd leave it as it is, but then I was already digging through my treasures for a little something to add. My first thought was using some lace o ribbon, but in the very end I remembered this huge gemstone swirl that I received from scrapping4fun ages ago. It was too big to use it on my cards, and as I didn't want to cut it into pieces, it tremained inn my stash.
Now, however, it turned out to be perfect to add a little fairy magic, and, to be perfectly honest, I was also happy to cover up the fairy a little bit as the image itself looks a *little* bit too sexy to me. I understand it would be perfect for some guy project, but as I didn't want to restrict the circle of recipients in the first place, I thought I'd make it a little bit more family friendly :) 
As shimmering as the box lookds on the outside, I decided to keep the inside plain and simple. On the inner front lid, I placed another layer of the fairy paper...
... while the first thing to do on the other side was covering up the glass film instructions that were printed on cardboard. Once I placed rice paper over the whole area, I added two pieces of shimmering paper to create pockets. I punched their borders with a decorative punch and placed some tiny pearls on the ornament. 
After that, I cut out one of the fairy messages from the paper block, enhanced it with another layer of background paper, and decorated it with a tiny bow. For a personalized message, I placed a bigger piece of white paper on shimmering background paper, and cut a little ornament in one border here as well. 
To spare me from cutting the tiny oval shape to cover the entire cardboard surface, and still make sure the entire inside area is covered, I added three pearls from my stash.
As both pieces of paper can be removed from their pockets, and since I decided to keep the foamy boundary, there's enough place to hide an additional "something" inside the box - money, a letter, a piece of jewelry...
For the back side, I decided to go with the patterned paper again, adding one last remaining swirl from my stash. And even though I thought about painting the brown cardboard with (silver?) acrylic paint, I decided to leave it like this in the end.
I'm not yet sure who is going to receive the magical message, so I just put it aside for a while. However, upon doing so, I couldn't help noticing that the big silver swirl might not be fairy magic at all. In fact, considering the way I placed it over the image, it might as well be a giant, shimmering fairy fart. Ooops!
A little contribution to the December collection of Create in Austria - artwork created by Austrians and/or in Austria.

challenges: 
613 avenue create: ATG
a bit more time to craft: ATG
butterfly challenge: fairy
C.R.A.F.T.: ATG
crafting with an attitude: ATG
craftyhazelnutspatternedpaper
creative moments: ATG
cutie pie challengeblog: add sparkle
friendship challenge: ATG
love to craft: ATG 
morgans artworld: ATG
pennys papertake: ATG
through the craftroom door: ATG
wortartwednesday: ATG

11 December, 2018

Winter scene

Just in time to join the latest craft-alnica challenge, I thought I'd create what the ladies wish to see: a Christmas card following a sketch. I certainly haven't done any proper cardmaking lately, and no sketch challenges in ages, but I guess sometimes you just need to push yourself out of your laziness comfort zone and get busy. 
Honestly, it took me quite a while to figure out what to do with the sketch, and once I knew exactly what I wanted, I couldn't find the one essential washi tape without which the original card made no sense whatsoever. 
However, since I've already cut and glued the cloudy background paper to the cardbase, I had to come up with a plan B, and come up with it fast. As I'm traveling back and forth between student's home and "home home" quite often lately, I'd have no access to my crafting supplies until a couple of hours before the chalenge would end, so, whatever I wanted to do, I had to do before leaving, then take the card home for some proper photoshooting and prepare the post. 
But then again, there was this cloudy background that made no sense, and searching through my stash didn't  bring the result I wished for. For a moment, I even thought that maybe I was just really wishing for the washi without actually buying it, and maybe it was just this strong wish that was playing with my mind... but I couldn't get rid of the feeling that the tape must be hidden somewhere near me.

Obviously, I needed a plan B and I needed it quick.

With the only other option being to abandon the whole thing, I decided to save what I could, flip the sketch and create something completely different. 
Instead of washi tape, the lines of the sketch would be represented by silver stars, the white curve that was now on the bottom of the card became a snow-covered surface, the central embellishment grew in height rather than in width, and if I put everything together as I thought, I might even be able to squeeze in a tiny sentiment to make the sketch complete.
Long story short told, this is the result:
As the missing washi tape made no point in keeping the main motif, I thought I'd place a snowman or Christmas tree on the snowy ground, or even just a bunch of flowers. Then, however, I remembered some paper cut-outs I had left over from last year and picked this adorable couple.
I enhanced the patterned paper by gluing it to another layer of cardboard, and before placing it on the card base for good, I thought I'd add a heart-shaped cut-out in the background. The handwriting paper is from my stash, the heart shape comes from a wooden heart that I replicated on paper before I cut along the lines.
The silver star stickers bring just the right amount of bling...
... and while the whole card is rather empty, I couldn't help myself adding a few embellishments: a couple of punched branches alongside with shimmering red rhinestones to resemble holly, as well as a tiny bow to cover up the nasty part of the glued branches.
For another layer of bling, I placed some leftover silver lace to the very bottom of the card, which should give a little contrast to the embossed polka dots in the snow. 
Finally, I printed a holiday sentiment, placed it on a layer of dark brown cardboard, and added it to the winter scene. Not exactly the card I had in mind when I started, but I think considering the circumstances it didn't turn out that bad in the end. 
A little contribution to the December collection of Create in Austria - artwork created by Austrians and/or in Austria.

challenges:

4 crafty chicks: ribbons/bows
613 avenue create: ATG
a bit more time to craft: ATG
alphabet challengeblog: S for season's greetings
basteltraum: winter/Chistmas
brown sugar: winter scene
C.R.A.F.T.: Christmas
cardmania: Christmas
city crafter: snowflakes
craft-alnica: sketch
crafting with an attitude: ATG
crafty calendar: Christmas time
crafty catz: ATG with optional twist "glitter & shine"
crafty gals corner: ATG
crafty sentiments: celebrate
craftyhazelnutschristmaschallenge: ATG as long as it's Christmas (optional twist "gems/pearls")
craftyhazelnutspatternedpaper
creative moments: ATG
do-all kreatives: Christmas/New Year
everybody art: Christmas
friendship challenge: ATG
fussy and fancy: winter/Christmas
inkspirational: ATG Christmas
love to craft: ATG 
love to scrap: season's greetings
pennys papertake: ATG
ribbon girl: any image
scrapping4fun: Christmas
12 months of Christmas: ATG
ribbon girl: ATG
through the craftroom door: ATG
winter wonderland: ATG Christmas
wortartwednesday: ATG
pinspirational
worldwide open design team challenge: ATG

And since Christmas is only a few steps away, I'm sure most people are currently busy with winter decorations, or even have everything prepared already. Not being in "the mood" yet, I don't think I'll set up anthing this year, but I like to see that mom has found joy in trying different combinations of greenery all around the house. A little different than last time, I think this little bouquet looks even more winter-ish, but as I was walking past some blooming bushes yesterday, I just had to pick a couple of blooms. I don't usually sneak things from other people's fences, but these just had to come with me - oops!

A contribution to the Friday Flowerday at Holunderbluetchen.

In the very end, you have three guesses on what I found when I was looking for the last embellishments to add to my card. I've absolutely no idea on what prompted me to store washi tape rolls into a container of wooden pearls that is placed in the only drawer I didn't open because I knew it contains the container of wooden pearls. 

Oh well... I guess I won't forget where the washi is in a while!

10 December, 2018

Off to Antwerp

Somewhere between holidays and studies, I thought I would combine the two options in visiting the AMSC, which would give me the chance to broaden my knowledge on emergency situations. Additionally, I would have the opportunity to see my favourite Belgian town again, re-visiting some old gems and discovering new places. 
As it is for fall, already the journey would be one between grey and blue skies, from rain and cold straight into paradise. And as much as I can't seem to like the feeling of being glued to the seat during take-off...
... there's absolutely no place that could compete with being above the clouds and marvel at their shapes and sizes.
With a little luck, even a lovely glory phenomenon will come to sight.
Are we there yet?
After a quick and easy ride from the airport (Ljubljana, watch and learn!), I could once again say hello to what was once the most beautiful train station to me - until I found my new favourite in Prague.
Welcomed by a mix of wind and showers, I decided to just stroll around until I'd be able to move into my room, unpack my things and try my first hostel experience.
And while the following days would be filled with lectures and workshops, there would still be plenty of time to explore the city: the Antwerp cathedral, as beautiful as ever...
... Mary statues on literally every corner...
... the most beautiful Grote Markt, dominated by guildhalls, the city hall, and Brabo's fountain...
... the old city center with its lovely streets and hidden corners...
... a flashback to one of my favourite childhood cartoons...
... and a perfect way to end a late summer evening: enjoying the sunset from the MAS museum, where the views get better with every storey.
With interesting lectures, new insights and colleagues from all over the world, the week passed in a blink, and already, it was time to head towards home.
Not without a peek into Antwerp's white beauty, though. 
To my surprise, I found it to be full of art this time - just as it used to be before the masterpieces have been moved to Paris and later returned the Royal Museum of Fine Arts in Antwerp.
Other than that, it's the wood carving that is part of the magic...
... as well as the high, white ceiling...
... the colourful windows of stained glass...
... and, of course, the magnificent paintings of Peter Paul Rubens, which - in a beautiful coincidence - lit up in the afternoon sun just before it was time for me to leave for the airport. 
Not with a carriage though ;)
And since I arrived at the airport more than just in time on time, I had plenty of opportunities to get annoyed by crowds of tourists, nagging children, and get through security obligations without having to rush. With the chilling lecture on the 2016 Zaventem attacks still in my mind, I decided to pay extra attention to what is happening around me - no paranoia, just in case.
But then again, being early not only means having a little bonus time but also having a *little* too long interval from the last snack. 
Was it hypoglycaemia or just my thoughts wandering around? Probably a combination of both that made me forget about my change after purchasing some yummy sushi on the way to my gate.
Realizing my mistake rather late, I was left with two options: forget about the whole thing, or head back through the entire airport, hope to get my money back, and try to make it back in time.
With little hope, I headed off, eventually got my money thanks to a wonderful employee, and - with lots of coughing and puffing - made it back right at boarding time.
Shall I plan even more time next time to avoid running late or less time to make sure I won't have the chance for hunger feelings and off-road temptations? Or maybe I should just pay more attention to my own actions rather than everything that is happening around me?