30 June, 2023

Green

"Green" is the challenge theme over at the Alphabet challenge blog this fortnight, and as you can guess, we'd like to see green as the dominant colour in your creations. It doesn't need to be a monochromatic project, just make sure this particular colour will be the most prominent thing of whatever you create.
That being said, I'll present you a necklace this time. I have been working mostly with paper for the past weeks and months, creating cards and other paper projects, and I really felt like doing something "non-paper" for a change. I also had a couple of leftover beads that I couldn't use otherwise, and I figured I'd just try to arrange them into something meaningful. I took a store-bought necklace base, and started threading random beads on its strings, as well as lots of crimp beads to keep them in place. I tried to make sure that I didn't repeat the shapes and colours too often, but other than that, the arrangement is completely random. Once I was satisfied with the layout, I fixed the beads with crimp beads, and that's about it. The necklace consists of numerous green beads of different shades and sizes, which I hope will inspire you to use green in your own projects. The non-green elements I used are mainly translucent beads and small arrangements of white pearls, which give a little more dynamic to the creation. Another element is the silver clasp with a heart pendant, which enables you to adjust the length of the necklace. 
In the end, I think it was fun to change my crafting medium for a bit. The necklace seems to be perfect for spring and summer days, as it resembles all the greenery that can be found in nature right now. 
I also like how it looks very airy due to all the "empty" space between the beads - I never created a necklace like this, but I really like how it turned out.
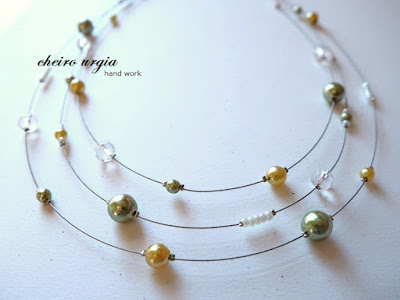
challenges:

22 June, 2023

Hello

Hello and welcome to another belated post from me. We've started a new challenge over at the Alphabet challenge blog last week, and as you may have noticed, we're looking for anything related to flying for the letter "F". 
For my DT inspiration, I decided to present a project that I've created a while ago: a little tag featuring beautiful critters by Nina Štajner. I've acquired them by re-using the cover of her paper collection, and decided to place them onto a black cardboard to create a square tag-like creation. 
I'd use those tag-like pieces to personalize packages for Ukrainian refugees last year. As one particular box was meant for a baby, I thought it would be perfect to use Nina Štajner's patterned paper with animals. On one side of my "card" there is a robin on a branch, as well as a golden "Hello" message. The other side features a little mouse surrounded by foliage. 
Black paper might not be your first colour of choice for cute images like this, but I figured it would be barely visible (which turned out to be corect). Another aspect that made me pick black was the fact that this was the thickest cardboard in my collection, and I had a reason for that, too: Inside of the main box that had to include basic hygiene products and baby items, one could optionally add a small personalized gift. I decided to make that gift by creating a card for a baby, and putting a few extra items into a cellophane bag. To enhance the bottom of said cellophane bag I created hand-made "Welcome" tags which I placed on the bottom of the bag in a way that would make the "Hello" visible from outside, while the other side would be covered by the items in the bag. I didn't glue the tag to the bottom of the bag so that it can be removed and used as a keepsake or decoration. I then closed the bags with twine, adding hand-made wooden ornaments which I'll show you some time later. I didn't take any pictures of the finished bags as they're see-through and I don't feel comfortable sharing other people's gifts. 

There's also a little mistake in my creation: For the welcome message I used a simple "Hello" which I created by using alphabet stickers from my stash. However, as I had previously run out of "L"s in this particular sticker font, I had to improvise by using the number "1" instead. I think it comes quite close to an L, and hope that the solution was good enough to cover up my misfortune. I'll show a few more tags in future to make up for my irregular postings, but I just can't keep up with life at the moment. 

challenges:
allsorts challengeblog: ATG with optional twist "blooms, bees and/or butterflies"
critter crazy: ATG animals
fabnfunky: use a sentiment

02 June, 2023

Birthday troll

Hello and welcome to another challenge over at the Alphabet challenge blog. Thanks for stopping by since the last time I checked in here. I'm crafting exclusively for my bi-weekly DT task at the moment as I still feel absolutely exhausted on a daily basis, but at least my DT spot gives me a reason to do something every now and then. I also received some encouraging results at today's check-up so I hope that things will get back to normal at some point, even though I don't see it coming yet. 
Anyway, we'd like to see easel cards for the letter "E", and I for myself decided to work with that adorable troll girl from Bugaboo. I printed her ages ago, but never really found a project that would suit her. For my easel card inspiration, I decided to combine her with this wonderful birthday-themed background paper. I cut the pieces in a way that would make sure I get to feature all the nice motifs: the pile of presents in the bottom part of the card, and the birthday message in the upright part. Coincidentally, the latter also had a balloon that matches nicely with the balloon that is featured in the digi. And that pretty much sets the tone for my DT project, which is full of matches and coincidences.
To recreate the cheerful mood of a (child's) birthday, I decided to colour the troll girl with bright and bold colours. Unfortunately, the light conditions made it impossible for me to make decent photos - in reality, I used coloured pencils for my colouring, meaning the colours should be way softer and a bit brighter than depicted. Oh, well. 
Once I was done, I placed the motif onto a piece of pink cardboard. I think it goes well with the pink balloon, and it also merges nicely into the overall bright colour scheme. To complete my card, I then took a strip of blue cardboard that featured embossed circles. 
It's only visible when you turn the card around, but I think it's a nice feature that makes sure there's no awkward white space left. And somehow, those embossed circles do remind me of balloons/lanterns, which again puts emphasis on the celebration theme.
To make sure the easel card will stay in position, I wanted to add a banner saying "Happy birthday" onto the bottom of the card. However, I thought it might interfere with the birthday message on the background paper. As an alternative, I opted for huge pink and blue gemstones I had in my stash forever since I hardly ever use this particular size of pearls and gems in my projects. I consider them way too big, which is why they'll be the "leftover pieces" of every sheet of perals/gemstones. This time, their size turned out to be perfect, as they're big enough to stop the upright part of my easel card from collapsing. Also, in a fun twist they match the colour scheme of pink and blue which somehow repeats all over in my card. What a fun crafting coincidence!

challenges: 
krafty chicks: stamp act
as you like it: pastels or brights (I opted for bright colours in my project as I feel like they express the joy and happiness that comes with a celebration, especially when it's a child's birthday. I feel like bright colours are the "caps lock" of crafting - the equivalent of being loud in a positive way)
crafty catz: ATG
love to craft: ATG 
nachteulen: ATG