I decided to go easy with a "Black & white" challenge for the letter B. You can link up anything you like as long as it includes those two colours only. I can't wait to have a look at your creations! First things first, though, let me telly you that our DT has prepared some awesome inspirational projects for you, so jump over to their pages to have a look!
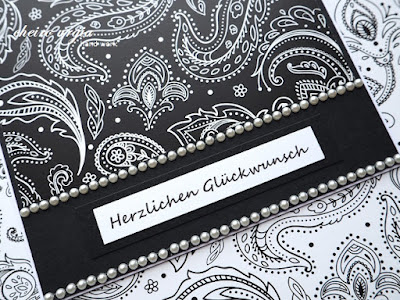
I for myself present you a black and white card. It's a rather simple project, and honestly, it was a bit of a crafting accident. At first, I thought I'd create a non-card project for you, but with some unexpected errands, I wouldn't be able to spend much time in my crafting corner. That being said, I started looking for black and white papers to create a card. I wanted to create something along the lines of "simple, but effective", meaning to hide the fact that it would be - again - a rather quick and easy card from me. However, it was easier said than done, as I had to realize that papers with black and white only were hard to find. I do have black cardboard in my stash, as well as different white papers, mostly with embossed motifs, but I couldn't possible think of a way to combine them into something meaningful without adding some other colour. Finally, I remembered those swirly black and white sheets I got myself ages ago when I was visiting my sister in Wuppertal. I figured I could combine them with some black and/or white papers from my stash, but I didn't want to produce a sympathy card, so I went for the next best occasion: an elegant black & white birthday card. I cut a piece of black cardboard and placed it onto a white cardbase. I then cut out a piece of the patterned paper, and tried to place it onto the card. I didn't want to fully cover the base, as I figured that an asymetrical arrangement would be better for such a colourless card. Also, I thought it would be a real challenge to place a sentiment and/or embellishments onto a card that would consist of square elements only.
That being said, I decided to place the patterned paper in the upper part of my card, while the lower part would remain black. This way, I created a blank canvas that could feature a simple (birthday) greeting. The text is printed, cut, and placed onto a strip of black paper. I like how it's almost invisible against the black background as I didn't use 3D adhesive pads, as if the greeting comes out of nowhere. However, upon closer inspection you may realize that there's a tiny "step" in place of the sentiment, as the additional cardboard layer stands out a bit as the additional layer of cardboard distinguishes from the background.
Now for the accident part: For the upper part of my card, I originally planned to use the other side of the patterned paper, namely the one that features black floral swirls on the white background. However, when I turned the piece around to apply adhesive tape, it struck me that the white-on-black pattern looks even better on the card. I think it has to do with the fact that the black background melts into the black cardbase, whereas the white background would be standing out, not merging with the blackness around it.
Once both pieces were secure, I couldn't help feeling like something was missing. In an attempt to fix the issue, I took a strip of tiny white pearls from my stash, and placed two lines of pearls in the lower part of my card: one line lies directly on the lower end of the card, white the other marks a border between the black card base and the patterned cardboard. It's interesting to see how this little step changed my project completely, bringing attention to the bottom part of my card, creating some sort of frame for the sentiment. With a limited selection of papers and embellishments, the card itself ended up very gender neutral, however, I can't help visualizing a male recipient. I'm not sure whether the load of pearls I added is suitable for a gentleman or not, as I would never place that amount of pearls on any card, but as they seem to blend in well with the background they might be acceptable still. What do you think?
challenges:
- 613 avenue create: ATG
- a place to start: ATG
- a place to start: ATG
- classicdesignchallenge: ATG DT
- crafty catz: ATG with optional twist "celebration"
- creative inspirations: ATG
- creative moments: ATG
- creative moments: ATG
- lil patch of crafty friends: ATG handmade
- morgans artworld: ATG
- pennys papertake: ATG
- use your stuff: layers


